If you’re new to this series, checkout the introductory post.
See the source code on Github
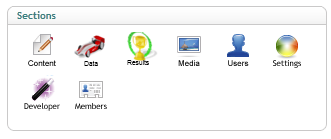
I’m going to create two new sections for manage my statistical data. The first section “Data” will contain the base data for the site: Drivers, Circuits, Teams, and Seasons (made up of races held at circuits at a specific time). The other section “Results” will be used to register driver/team combinations for a season and to enter the results of each driver/team at each race. The creation of each custom content tree follows the basic steps:
- Define the section in the umbracoApp table
- Add new section to your language file
- Define tree nodes in the umbracoAppTree table
- Derive a class from umbraco.cms.presentation.Trees.BaseTree to populate your custom 1st level sub trees.
- Implement a class from the umbraco.interfaces.ITaskReturnUrl interface for nodes of the tree
- Create a Page for each item to maintain
- Create Custom User Controls for new items where required.
- Define the nodes in the UI.xml file
Define the section in the umbracoApp table
To let Umbraco know about the new section I need to create an entry in the umbracoApp table. This defines the following fields
| sortOrder |
This defines the order of the section in the sections displayed |
| appAlias |
The appAlias is used to identify your section to umbraco |
| appIcon |
Defines a css class in /umbraco/css/umbracoGui.css that determines the icon to display in the section. There are other tutorials online on how to do this. Some recommend just using your custom background image, while others recommend adding your image to the existing tray icons sprite. I’m going with the later method. |
| appName |
This is your section name. |
| appInitWithTreeAlias |
This can safely be left as NULL. I’m not sure exactly what purpose it serves, but this is the advice I read elsewhere. |
After I defined my new section I had to add it to my language file, at /umbraco/config/lang/en.xml, in the sections area. (<area alias=”sections”>) This gives the section an English title. Following the configuration I will end up with a section container like the following:
Define a tree nodes in the umbracoAppTree table
The next step is to define some tree nodes for my new content tree. This is done in the umbracoAppTree table. I’ll only define nodes for subtrees I don’t generate in code. These are the Driver, Team, Circuit, Seasons nodes in the Data section and the Results node in the Results section. The Results content tree is a tricky one because all but the root node depend on data created in the Data section. We’ll get to that in the next post.
| treeSilent |
leave this value as 0 |
| treeInitialize |
set this value to 1 |
| treeSortOrder |
This is the position of your node within the tree |
| appAlias |
This is the alias of the app, as entered in the umbracoApp table. Mine will be dataentry and results |
| treeAlias |
This is the alias of the tree node |
| treeTitle |
This is the title of the tree node. |
| treeIconClosed |
This is the icon to use when the node is not expanded |
| treeIconOpen |
This is the icon to use when the node is expanded. I’ve found this doesn’t make a difference. |
| treeHandlerAssembly |
This is the name of the assembly that contains the code umbraco will call to perform actions on your tree. Don’t include the dll extension. |
| treeHandlerType |
This is the Type that handles the loading of your tree contents. Contained in the above assembly |
| action |
leave this as null |
Derive a class from umbraco.cms.presentation.Trees.BaseTree
Now I need to create a class (Type) that umbraco will use to populate my tree contents, as declared in the treeHandlerType field in the umbracoAppTree table. I need to fill out the contructor, override the CreateRootNode method which will create a node in the tree, following what’s in the table above, override the Render method which will populate my tree, and finally override the RenderJS method with code needed to open the edit page for my content.
using atomicf1.domain.Repositories;
using atomicf1.persistence;
using umbraco.cms.presentation.Trees;

namespace atomicf1.cms.presentation.Trees
{
    public class loadDrivers : BaseTree
    {
        private IDriverRepository _driverRepository;

        public loadDrivers(string application) : base(application)
        {
            _driverRepository = new DriverRepository();
        }

        protected override void CreateRootNode(ref XmlTreeNode rootNode)
        {
            rootNode.Icon = FolderIcon;
            rootNode.OpenIcon = FolderIconOpen;
            rootNode.NodeType = TreeAlias;
            rootNode.NodeID = "init";
        }

        public override void Render(ref XmlTree tree)
        {
            var drivers = _driverRepository.GetAll();

            foreach(var driver in drivers) {
                var dNode = XmlTreeNode.Create(this);
                dNode.NodeID = driver.Id.ToString();
                dNode.Text = driver.Name;
                dNode.Icon = "user.png";
                dNode.Action = "javascript:openDrivers(" + driver.Id + ")";
                tree.Add(dNode);
            }
        }

        public override void RenderJS(ref System.Text.StringBuilder Javascript)
        {
            Javascript.Append(
                @"
                    function openDrivers(id)
                    {
                        parent.right.document.location.href = 'plugins/atomicf1/editDriver.aspx?id=' + id;
                    }
                ");
        }
    }
}
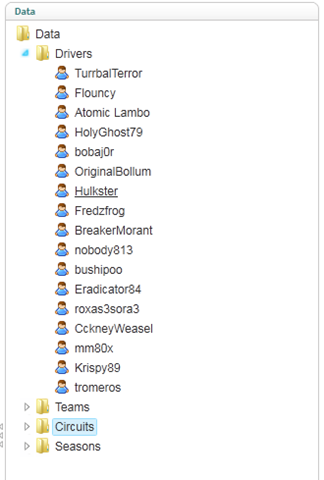
Following this I should end up with (mine’s been populated) a tree that looks like the following
Implement a class from the umbraco.interfaces.ITaskReturnUrl interface
I need to implement a class that will allow me to create the initial entities in my tree. To do this I must implement the umbraco.interfaces.ITaskReturnUrl interface and stub out some key methods. I’ll create a base class to handle the common stuff…
using umbraco.interfaces;

namespace atomicf1.cms.presentation
{
    public abstract class BaseTasks : ITaskReturnUrl
    {
        protected const string BasePageDirectory = "plugins/atomicf1/";

        protected string _returnUrl;
        protected string _alias;
        protected int _typeId;
        protected int _parentId;
        protected int _userId;

        public string ReturnUrl
        {
            get { return _returnUrl; }
        }

        public string Alias
        {
            get
            {
                return _alias;
            }
            set
            {
                _alias = value;
            }
        }

        public abstract bool Delete();

        public int ParentID
        {
            get
            {
                return _parentId;
            }
            set
            {
                _parentId = value;
            }
        }

        public abstract bool Save();


        public int TypeID
        {
            get
            {
                return _typeId;
            }
            set
            {
                _typeId = value;
            }
        }

        public int UserId
        {
            set { _userId = value; }
        }
    }
}
Then I’ll need a class to do the Saving and Deleting of my entities. This isn’t needed when I use a User Control (ascx) to create entities. I will do this later on, when I need to save more than just the name with each entity (mandatory fields). My code will utilise my repositories to do the persistence.
using atomicf1.domain;
using atomicf1.domain.Repositories;
using atomicf1.persistence;

namespace atomicf1.cms.presentation
{
    public class driverEntryTasks : BaseTasks
    {
        private readonly IDriverRepository _repository;

        public driverEntryTasks()
        {
            _repository = new DriverRepository();
        }

        public override bool Delete()
        {
            var driver = _repository.GetById(ParentID);
            _repository.Delete(driver);
            ;

            return true;
        }

        public override bool Save()
        {
            var driver = new Driver { Name = Alias };
            _repository.Save(driver);

            _returnUrl = BasePageDirectory + "editDriver.aspx?id=" + driver.Id;

            return true;
        }
    }
}
Create a Page for each item to maintain
Next I’ll need to create a page to maintain each entity. This page is opened by the javascript I added to my RenderJS method and node.Action property a few steps ago. Umbraco has numerous inbuilt controls to facilitate creating a consistent admin UI so I’ve gone and utilised those. The following is just standard ASP.NET webforms stuff.
<%@ Page Language="C#"  MasterPageFile="../../masterpages/umbracoPage.Master" AutoEventWireup="true" CodeBehind="editDriver.aspx.cs" Inherits="atomicf1.cms.presentation.pages.editDriver" %>
<%@ Register Namespace="umbraco.uicontrols" Assembly="controls" TagPrefix="umb" %>

<asp:Content ID="Content" ContentPlaceHolderID="body" runat="server">

    <umb:UmbracoPanel ID="Panel1" runat="server" hasMenu="true" Text="Edit Circuit">

        <umb:Pane ID="Pane1" runat="server">

            <umb:PropertyPanel ID="PPanel3" runat="server" Text="Atomic Username">
                <asp:TextBox ID="AtomicName" runat="server" MaxLength="50"
                CssClass="guiInputText guiInputStandardSize"></asp:TextBox>
            </umb:PropertyPanel>

            <umb:PropertyPanel ID="PPanel1" runat="server" Text="Driver Name">
                <asp:TextBox ID="DriverNameTextBox" runat="server" MaxLength="50"
                CssClass="guiInputText guiInputStandardSize"></asp:TextBox>
            </umb:PropertyPanel>

            <umb:PropertyPanel ID="PPanel2" runat="server" Text="Nationality">
                <asp:TextBox ID="NationalityTextBox" runat="server" MaxLength="50"
                CssClass="guiInputText guiInputStandardSize"></asp:TextBox>
            </umb:PropertyPanel>

            <umb:PropertyPanel ID="PPanel4" runat="server" Text="Atomic User ID">
                <asp:TextBox ID="AtomicUserId" runat="server" MaxLength="50"
                CssClass="guiInputText guiInputStandardSize"></asp:TextBox>
            </umb:PropertyPanel>

        </umb:Pane>

        <umb:Pane ID="Pane2" runat="server">
            <umb:PropertyPanel ID="PropertyPanel1" runat="server" Text="Url">
                <asp:TextBox ID="UrlTextBox" runat="server" MaxLength="70"
                CssClass="guiInputText guiInputStandardSize"></asp:TextBox>
            </umb:PropertyPanel>
        </umb:Pane>

    </umb:UmbracoPanel>

</asp:Content>
In the code behind I'll add the details on how to populate and save changes to my entity.
using System;
using System.Web.UI;
using System.Web.UI.WebControls;
using atomicf1.domain.Repositories;
using atomicf1.persistence;
using umbraco.BasePages;

namespace atomicf1.cms.presentation.pages
{
    public partial class editDriver : BasePage
    {
        private IDriverRepository _repository;

        protected void Page_Load(object sender, EventArgs e)
        {
            if (!IsPostBack)
            {
                int id = int.Parse(Request["id"]);

                LoadRecord(id);
            }
        }

        protected void LoadRecord(int id)
        {
            var driver = _repository.GetById(id);
            if (driver != null) {
                DriverNameTextBox.Text = driver.Name;
                NationalityTextBox.Text = driver.Nationality;
                AtomicName.Text = driver.AtomicName;
                AtomicUserId.Text = driver.AtomicUserId.ToString();
                UrlTextBox.Text = driver.Url;
            }
        }

        protected override void OnInit(EventArgs e)
        {
            base.OnInit(e);

            _repository = new DriverRepository();

            ImageButton save = Panel1.Menu.NewImageButton();
            save.ImageUrl = umbraco.GlobalSettings.Path + "/images/editor/save.gif";
            save.AlternateText = "Save";
            save.Click += new ImageClickEventHandler(SaveRecord);

        }

        void SaveRecord(object sender, ImageClickEventArgs e)
        {
            if (Page.IsValid) {

                var driver = _repository.GetById(int.Parse(Request["id"]));
                if (driver != null) {
                    driver.Name = DriverNameTextBox.Text;
                    driver.Nationality = NationalityTextBox.Text;
                    driver.AtomicName = AtomicName.Text;
                    driver.AtomicUserId = int.Parse(AtomicUserId.Text);
                    driver.Url = UrlTextBox.Text;

                    _repository.Save(driver);
                }

                BasePage.Current.ClientTools.ShowSpeechBubble(speechBubbleIcon.save, "Saved",
                                                              "Driver details have been saved.");
            }
        }
    }
}
Create Custom User Controls for new items where required
There are some cases where I’ll need to save more than just the entity name, such as when I create registrations for a particular season. Rather than use the default simple.ascx control, I can make my own. To register a driver and team for a season I’ll need to select the team and driver, from the list of entrants for a particular season. I’ll know which season I’m registering for based on the node selected in the tree.
First the html for the page
<%@ Control Language="C#" AutoEventWireup="true" CodeBehind="createSeasonEntry.ascx.cs" Inherits="atomicf1.cms.presentation.controls.createSeasonEntry" %>
<input type="hidden" name="nodeType">
<div style="MARGIN-TOP: 20px">
Driver:<asp:RequiredFieldValidator id="RequiredFieldValidator1" ErrorMessage="*" ControlToValidate="DriverList" runat="server">*</asp:RequiredFieldValidator><br />
<asp:DropDownList ID="DriverList" runat="server" CssClass="bigInput" Width="300px" />
<!-- added to support missing postback on enter in IE -->
<asp:TextBox runat="server" style="visibility:hidden;display:none;" ID="Textbox1"/>
<br />
Team:<asp:RequiredFieldValidator id="RequiredFieldValidator2" ErrorMessage="*" ControlToValidate="TeamList" runat="server">*</asp:RequiredFieldValidator><br />
<asp:DropDownList ID="TeamList" runat="server" CssClass="bigInput" Width="300px" />
</div>
<div style="padding-top: 25px;">
<asp:Button id="sbmt" Runat="server" style="Width:90px" onclick="sbmt_Click" Text="Create"></asp:Button>
<em>or</em>
<a href="#" style="color: blue" onclick="UmbClientMgr.closeModalWindow()">Cancel</a>
</div>
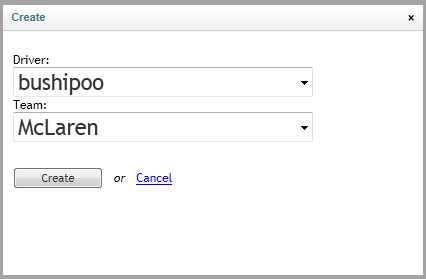
If I’m not sure what to put in here I can always look at the existing simple.ascx control as a guide. The above will create a UI that looks like this:
Next I’ll need to write some code-behind to perform my logic. You may notice I haven’t yet upgraded this to my Repository/Domain Model. The astitute will also notice I’m not allowing registration of those already registered.
using System;
using System.Collections.Generic;
using umbraco.BasePages;
using atomicf1.domain;

namespace atomicf1.cms.presentation.controls
{
    public partial class createSeasonEntry : System.Web.UI.UserControl
    {
        protected void Page_Load(object sender, EventArgs e)
        {
            if (!IsPostBack) {

                var reader = umbraco.BusinessLogic.Application.SqlHelper.ExecuteReader(
                    @"
                    SELECT D.*
                    FROM Driver D
                    WHERE NOT EXISTS (SELECT * FROM DriverContract DC WHERE DC.DriverId=D.DriverId AND DC.SeasonId=@seasonId)",
                    umbraco.BusinessLogic.Application.SqlHelper.CreateParameter("@seasonId", SeasonId));

                var allDrivers = new List<Driver>();
                while (reader.Read()) {
                    var driver = new Driver()
                                     {
                                         Id = reader.GetInt("driverid"),
                                         Name = reader.GetString("name")
                                     };

                    allDrivers.Add(driver);
                }

                reader = umbraco.BusinessLogic.Application.SqlHelper.ExecuteReader(
                    @"
                        SELECT *
                        FROM Team");

                var allTeams = new List<Team>();
                while (reader.Read()) {
                    var team = new Team()
                                   {
                                       Id = reader.GetInt("teamid"),
                                       Name = reader.GetString("name")

                                   };

                    allTeams.Add(team);
                }

                DriverList.DataSource = allDrivers;
                DriverList.DataTextField = "Name";
                DriverList.DataValueField = "Id";
                DriverList.DataBind();
                TeamList.DataSource = allTeams;
                TeamList.DataTextField = "Name";
                TeamList.DataValueField = "Id";
                TeamList.DataBind();
            }
        }

        private int SeasonId
        {
            get { return int.Parse(umbraco.presentation.UmbracoContext.Current.Request["nodeId"]); }
        }

        protected void sbmt_Click(object sender, EventArgs e)
        {
            if (Page.IsValid) {

                // get it from the parent. but how?
                var seasonId = umbraco.presentation.UmbracoContext.Current.Request["nodeId"];

                const string insertStatement =
                    @"insert into drivercontract (datecommenced, dateterminated, teamid, driverid, seasonid)
                    values(getdate(), null, @teamid, @driverid, @seasonid)";

                umbraco.BusinessLogic.Application.SqlHelper.ExecuteNonQuery(
                    insertStatement,
                    umbraco.BusinessLogic.Application.SqlHelper.CreateParameter(
                        "@driverid", int.Parse(DriverList.SelectedValue)),
                    umbraco.BusinessLogic.Application.SqlHelper.CreateParameter(
                        "@teamid", int.Parse(TeamList.SelectedValue)),
                    umbraco.BusinessLogic.Application.SqlHelper.CreateParameter(
                        "@seasonid", int.Parse(seasonId)));

                BasePage.Current.ClientTools.ReloadActionNode(false, true);
                BasePage.Current.ClientTools.CloseModalWindow();
                BasePage.Current.ClientTools.ShowSpeechBubble(BasePage.speechBubbleIcon.save, "Saved", "Driver Contract for this season has been created");
            }
        }
    }
}
The main points of interest are this line:
var seasonId = umbraco.presentation.UmbracoContext.Current.Request["nodeId"];
where I find the seasonId I’ll be registering to, and:
BasePage.Current.ClientTools.ReloadActionNode(false, true);
BasePage.Current.ClientTools.CloseModalWindow();
BasePage.Current.ClientTools.ShowSpeechBubble(BasePage.speechBubbleIcon.save, "Saved", "Driver Contract for this season has been created");
where I’m giving feedback to the user.
Define the nodes in the UI.xml file
Finally, and very importantly, I need to define my node in the /umbraco/config/create/UI.xml file. This tells umbraco what ITaskReturnUrl to use and which control to use to create entities (a custom user control or the default simple.ascx). To configure this file create a new nodeType entity, down with the others.
| alias |
The alias of your node defined in umbracoAppTree |
| header |
The header of section, used in the edit page |
| usercontrol |
The user control to create entities with |
| tasks/create |
The assembly and type that implements ITaskReturnUrl and does the saving |
| tasks/delete |
The assembly and type that implements ITaskReturnUrl and does the deleting |
That’s a lot to digest. Hopefully it’s pretty straight forward. If not, you know where to find me  .
.
In the next post I’ll look at a more advanced situation of custom tree creation, where nested trees, down many levels, need to be created from the database. This was “fun” to figure out
Not asleep yet? Go checkout the next post in this series: creating custom multi-level trees in Umbraco